

Embryo Transfer into the Oviduct
In our laboratory, we transfer 2-cell embryos through the wall of the oviduct of pseudopregnant recipients. This procedure is much easier and simpler to conduct than the conventional embryo transfer procedure, and is therefore suitable for inexperienced users.Materials and Equipment
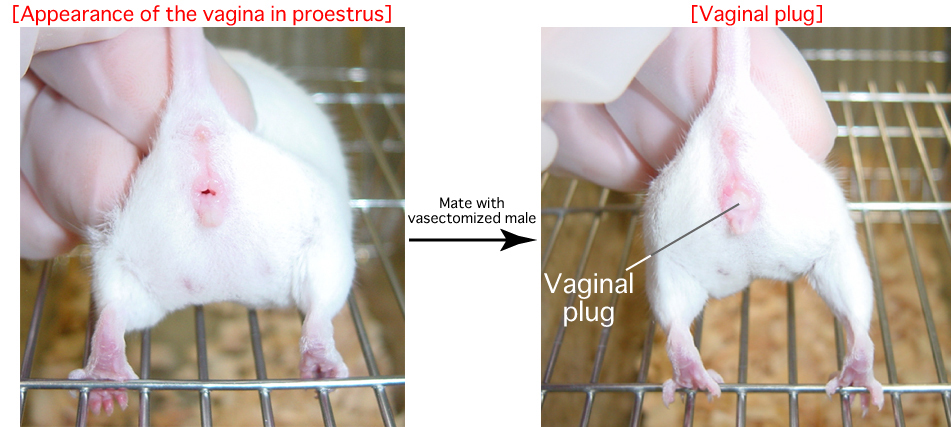
- Female mice on Day 1 of pseudopregnancy (the day on which a vaginal plug is observed)
- Micro-spring scissors (5mm blade)
- Pair of watchmaker's #5 forceps
- Serrefine clamp
- Wound clip (Autoclip 9mm; Clay Adams 427631) and clip applicator (Mik-Ron Autoclip Applier; Clay Adams 427630)
- Plastic dish (35mm x 10mm Cat.No.430588; CORNING)
- Glass capillaries for embryo transfer and handling
Procedure
Preparation of Mice
- Anesthetize a female mouse.
- Pull out the ovary, oviduct, and part of the uterine horn as per the conventional procedure.
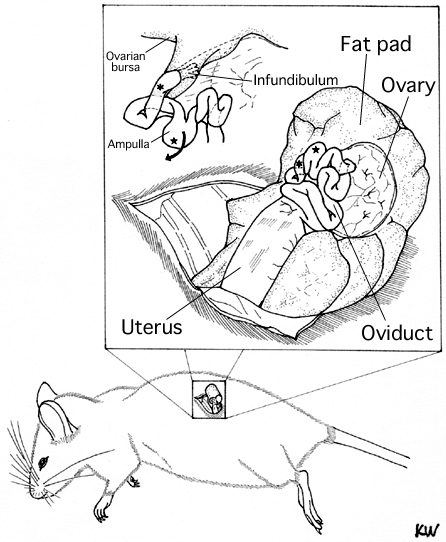
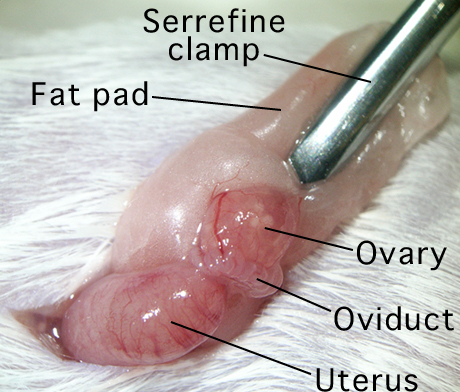
- Clip a serrefine clamp onto the fat pad which is attached to the ovarian bursa.
Positioning of Oviduct
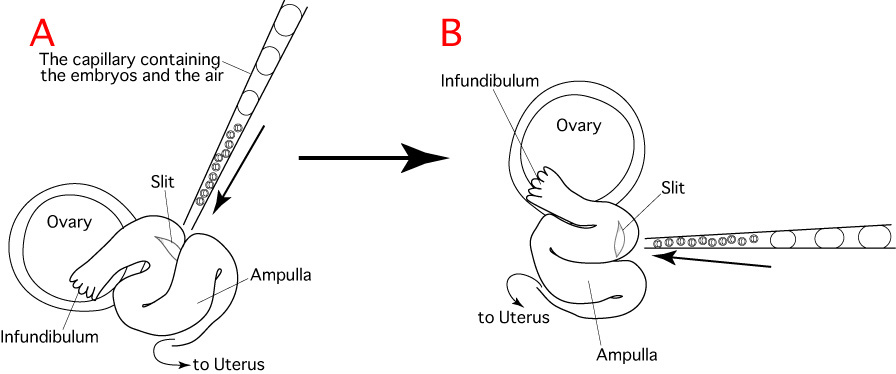
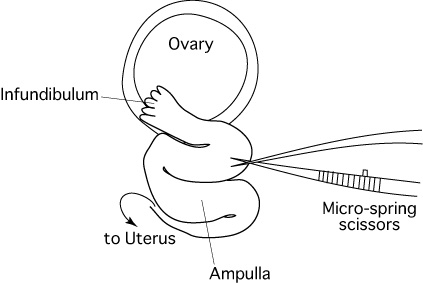
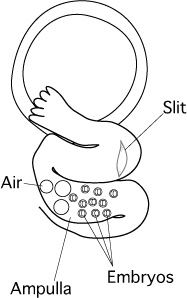
As indicated in the diagram below, embryo transfer into the oviduct is carried out by cutting the oviduct, inserting a capillary thereinto and expelling embryos towards the ampulla.Unfortunately, the oviducts of mice are small and the ducts are folded in a complicated manner, as we can see in the schematic diagram of an exteriorized oviduct below (A).
This makes it very difficult to insert the capillary into the oviduct towards the ampulla, because the insertion is made from above.
To make this procedure easier, position the oviduct by changing the position of the serrefine clamp and the mouse before starting the operation (B).
- Observe the oviduct under a stereomicroscope and confirm the position of the infundibulum and ampulla using the tip of a set of forceps, or by changing the position of the serrefine clamp.
- Position the oviduct by changing the position of the serrefine clamp and the mouse.
Note: Because the folds in the oviduct vary between each mouse, look closely and adjust the position of the oviduct to make easier to work on. Comment: If you are left-handed, position the oviduct so that you can easily carry out the procedure with your left hand.
Preparation of Embryos and Glass Capillary
- Make a 200μL drop of KSOM/AA in a dish (without liquid paraffin), and introduce 20 embryos into the drop.
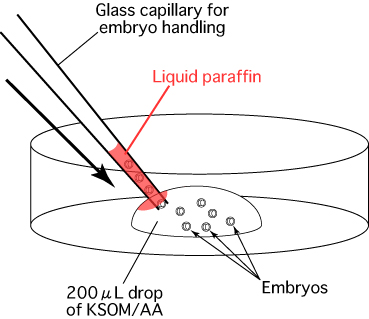
- Aspirate air and medium in alternate intervals of 2-3mm into a glass capillary in preparation for embryo transfer. Draw ten embryos into the glass capillary.

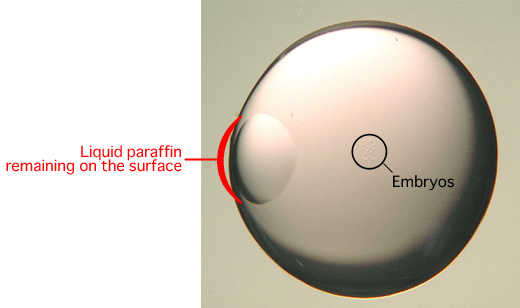
Comment: When the glass capillary is first inserted into the drop, some liquid paraffin will remain on the outer surface of the drop as shown below. The embryos should be drawn into the glass capillary from the opposite side of the drop to avoid sucking up any liquid paraffin. Evidence suggests that liquid paraffin which passes into the oviduct may have adverse effects on the development of the embryos into offspring.
Embryo Transfer
- Using a pair of watchmaker's #5 forceps and micro-spring scissors, dissect the wall of the oviduct between the infundibulum and ampulla.
- Insert the tip of the capillary containing the embryos into the slit, then push the capillary further into the slit towards
the ampulla.
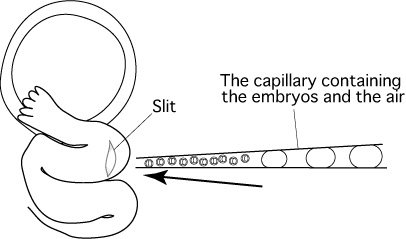
- Use the forceps to hold the portion of the oviduct into which the capillary was inserted.
- Expel the embryos and 2-3 of the air bubbles into the ampulla.
Comment: If performed successfully, you should be able to see air bubbles through the wall of the ampulla. Note: If you cannot expel the embryos and the air bubbles into the oviduct, pull the capillary back out just a little from the slit and expel them again.
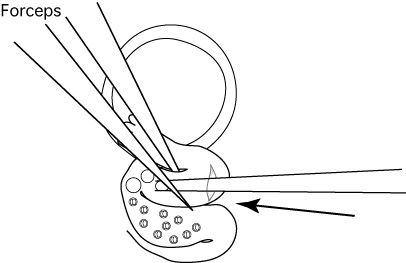
- Withdraw the capillary gently from the slit.
[Transferring Embryos into Oviduct]
Note: Transfer the embryos after adjusting the position and direction of the oviduct. If the oviduct is aligned parallel to the capillary, then it will be easier to insert the capillary into the oviduct.
- Push the ovary, oviduct and uterine horn back into the abdomen and close the wound using wound clips.

- Repeat the process to transfer the remaining 10 embryos into the other oviduct as described above.
- Keep the mice warm on a 37℃ warming plate until the mouse recovers from the effects of the anesthesia.
References
- Nakagata N. 1992. Embryo transfer through the wall of the fallopian tube in mice. Exp. Anim. 41: 387-388.
- Nagy A., Gertsenstein M., Vintersten K., and Behringer R. 2003. Manipulating the Mouse Embryo, A Laboratory Manual (Third edition). Cold Spring Harbor Laboratory Press. ISBN 0-87969-591-9.
Update history
- Updated : 6 November, 2012
- Modified : 10 January, 2013
The note under the movie was added.